Wednesday, November 30, 2022

JavaScript Import and Export

With the modular approach in JavaScript you can create a module which may contain variables, classes, functions. You can make them available in another JS file, for that you use export and import.

Breaking your code into separate modules makes it easy to maintain, more readable and increases reusability.

Export in JavaScript

Export declaration is used to export values (variables, classes, functions) from a JavaScript module. There are two types of exports-

  1. Named exports
  2. Default exports

Named exports

For using named exports you have two ways; either use export keyword with each entity or use export at the end with all entities at once.

Example when used with each entity individually.

ExportImport.js

// exporting an array
export let numArr = [1, 2, 3, 4, 5];

// exporting a constant
export const MODULE_NAME = 'ExportImport';

// exporting a function
export function hello(){
  return 'Greetings';
}

Exporting later

let numArr = [1, 2, 3, 4, 5];
const MODULE_NAME = 'ExportImport';
function hello(){
  return 'Greetings';
}
export {numArr, MODULE_NAME, hello};

You can also specify an alias while exporting using as keyword.

export {numArr, MODULE_NAME as mn, hello};

Default Exports

You may have modules declaring a single entity. Actually, this approach is preferred most of the time. If there is only a single entity in your module then you can use export default to export that entity.

You can have only a single export default per file.

ExportDefault.js

const hello = () => {
  const user = {
    name: 'Robert',
    email: 'abc@xyz.com'
  }
  console.log(user);
}

export default hello;

Import in JavaScript

You can import in a file using import keyword. If you are importing a named export then you have to wrap it in curly braces. When importing a default export then curly braces are not to be used.

JavaScript import example for named exports

Here is a HTML which imports named export from ExportImport.js file.

ExportImportDemo.html

<!DOCTYPE html>
<html>
<head>
<meta charset="ISO-8859-1">
<title>Insert title here</title>
</head>
<body>
<script type="module">
import {numArr, MODULE_NAME, hello} from './ExportImport.js'
document.getElementById("func").innerHTML = hello();
document.getElementById("mod").innerHTML = MODULE_NAME;
document.getElementById("arr").innerHTML = numArr;
</script>
<p id="func"></p>
<p id="mod"></p>
<p id="arr"></p>
</body>
</html>  

Points to note here-

  1. You need to include script in your HTML with a <script> element of type="module", so that it gets recognized as a module.
  2. Named exports are imported by using import keyword and wrapping entities with in curly braces.
  3. import {numArr, MODULE_NAME, hello} from './ExportImport.js'
    
  4. You can't run JS modules directly in a browser via a file:// URL — you'll get CORS errors. You need to run it via an HTTP server. I used IIS in a Windows machine.
JavaScript Import and Export

JavaScript import example for default exports

Here is a HTML which imports named export from ExportDefault.js file.

ExportDefaultDemo.html

<!DOCTYPE html>
<html>
<head>
<meta charset="ISO-8859-1">
<title>Insert title here</title>
</head>
<body>
<script type="module">
import hello from './ExportDefault.js'
hello();
</script>
</body>
</html>

Note that the curly braces are not required when importing default export.

import hello from './ExportDefault.js'

That's all for this topic JavaScript Import and Export. If you have any doubt or any suggestions to make please drop a comment. Thanks!


Related Topics

  1. JavaScript Spread Operator
  2. JavaScript Arrow Function With Examples
  3. React HelloWorld App - First React App

You may also like-

  1. Python First Program - Hello World
  2. Python for Loop With Examples
  3. Java Semaphore With Examples
  4. Armstrong Number or Not Java Program

Tuesday, November 29, 2022

Python Program to Reverse a String

In this post we'll see how to write a Python program to reverse a string, there are several options to do that, the options given in this post are listed below-

  1. Using a loop to reverse a string.
  2. Using a recursive function.
  3. Using string slicing
  4. Using reversed() function and join() method

Using loop to reverse a string Python program

If you are asked to write Python program to reverse a string without using any inbuilt function or string method you can use a loop to add characters of a string in a reverse order in each iteration to form a new String.

def reverse_string(string):
  rstring = ''
  for char in string:
    rstring = char + rstring
  return rstring

s = 'Python Programming'
rstring = reverse_string(s)
print('Original String-', s, 'Reversed String-', rstring)

Output

Original String- Python Programming Reversed String- gnimmargorP nohtyP

Using recursive function to reverse a string

In recursive function, in each recursive call to the function you pass the sliced string where start index is 1 (i.e. exclude first char (index 0) in each call) and add the first char of the passed String at the end.

def reverse_string(string):
  if len(string) == 1:
    return string
  else:
    return reverse_string(string[1:]) + string[0]

s = 'Hello World'
rstring = reverse_string(s)
print('Original String-', s, 'Reversed String-', rstring)

Output

Original String- Python Programming Reversed String- gnimmargorP nohtyP

Using string slicing

One of the best way to reverse a string in Python is to use String slicing. In string in Python you can also use negative indexing. When negative number is used as index, String is accessed backward so -1 refers to the last character, -2 second last and so on. Thus, by providing increment_step as -1 in string slicing you can reverse a string.

def reverse_string(string):
  reversed = s[::-1]
  return reversed

s = 'Hello World'
rstring = reverse_string(s)
print('Original String-', s, 'Reversed String-', rstring)

Output

Original String- Hello World Reversed String- dlroW olleH

Using reversed() function and join() method

In built function reversed() in Python returns a reverse iterator. Python String join() method returns a string which is created by concatenating all the elements in an iterable. By combining both of these you can get a reversed string in Python.

def reverse_string(string):
  rstring = "".join(reversed(string))
  return rstring

s = 'Python Programming'
rstring = reverse_string(s)
print('Original String-', s, 'Reversed String-', rstring)

Output

Original String- Python Programming Reversed String- gnimmargorP nohtyP

That's all for this topic Python Program to Reverse a String. If you have any doubt or any suggestions to make please drop a comment. Thanks!

>>>Return to Python Programs Page


Related Topics

  1. Convert String to int in Python
  2. Python Program to Count Occurrences of Each Character in a String
  3. Python Program to Display Armstrong Numbers
  4. Check String Empty or Not in Python
  5. Python Functions : Returning Multiple Values

You may also like-

  1. Python assert Statement
  2. Operator Overloading in Python
  3. Nonlocal Keyword in Python With Examples
  4. User-defined Exceptions in Python
  5. How ArrayList Works Internally in Java
  6. Type Erasure in Java Generics
  7. java.lang.ClassNotFoundException - Resolving ClassNotFoundException in Java
  8. Spring Object XML Mapping (OXM) Castor Example

Monday, November 28, 2022

JavaScript Arrow Function With Examples

The JavaScript arrow function expression is a concise and more compact alternative to a normal function but it has some limitations too.

Syntax of arrow function

Arrow function is written using the fat arrow (=>). Zero or more arguments on the left side of the arrow and expression on the right side.

When no arguments-

() => expression

With single argument-

arg => expression

With multiple arguments-

(arg1, arg2, …) => expression

JavaScript arrow function example

First let's write a normal JavaScript function and then its arrow function counterpart to make it easy to understand how it differs from a normal function.

Here is a simple function hello which just returns a message.

function hello(){
	return "Greetings!"
}

If you have to write it using arrow function.

const hello = () => {
  return "Greetings!"
}

What you have to do is to remove function keyword and function name and place an arrow between the argument and opening body bracket.

() => {
  return "Greetings!"
}

Arrow functions are always anonymous functions. You can assign the arrow function to a variable so it has a name. That's what is done by assigning it to const hello.

You can call the function using this variable name.

let s = hello()
console.log(s);

You can make the above arrow function more compact; if an arrow function has only a single return statement, then you can remove the curly braces and return keyword. The return is implied.

const hello = () => "Greetings!"

Arrow function with single parameter

const hello = (name) => "Greetings " + name + "!";

If your arrow function has a single parameter then the parenthesis is optional.

const hello = name => "Greetings " + name + "!"

Arrow function with multiple parameters

const sum = (a, b) => a + b;

Remember that parenthesis can't be omitted in the case of multiple parameters and no parameters, only in the case of single parameter you can omit parenthesis.

Multiline arrow functions

If you are writing an arrow function with multiple expressions and statements then you need to enclose them in curly braces. An explicit return is also required since curly braces require a return within them to return a value.

For example, an arrow function to get maximum value using if-else.

const max = (a, b) => {
  let m;
  if(a > b)
    m = a;
  else
    m = b;
  return m;
}

Of course, the same thing can be written in a much more compact way using ternary operator.

const max = (a, b) => (a > b) ? a : b;

Limitations of arrow functions

  1. With arrow functions there are no binding of this. The value of this is determined by the surrounding scope instead.
  2. Arrow functions should not be used as class methods because of the way this is used in case of arrow functions.
  3. Arrow functions cannot be used as constructors because they do not have a prototype property.

That's all for this topic JavaScript Arrow Function With Examples. If you have any doubt or any suggestions to make please drop a comment. Thanks!


Related Topics

  1. JavaScript Spread Operator
  2. JavaScript Import and Export
  3. JavaScript Array map() Method
  4. JavaScript filter Method
  5. React HelloWorld App - First React App

You may also like-

  1. Angular Application Bootstrap Process
  2. Lambda expressions in Java 8
  3. How HashMap internally works in Java
  4. How to Untar a File in Java

Sunday, November 27, 2022

Why no Multiple Inheritance in Java

Inheritance is one of the four fundamental OOP concepts. It can be defined as a mechanism, by which one class acquires, all the properties and behaviors of another class. Java being an object oriented language does support inheritance. Though with in inheritance there are several types like-

  • Single inheritance
  • Multi-level inheritance
  • Multiple inheritance
  • Hierarchical inheritance
  • Hybrid inheritance

Out of these Java does not support multiple inheritance, in this post we'll see why multiple inheritance is not supported in Java.


Multiple inheritance support in Java

Multiple inheritance as the name suggests means inheriting from multiple sources, it may be classes or interfaces.

Out of these two sources Java doesn’t support multiple inheritance through classes. So you are not permitted to extend more than one class in Java. Though you can still implement several interfaces.

For example, if there are three classes- ClassA, ClassB and ClassC. Then-

public class ClassA extends ClassB, ClassC 

Where ClassA is trying to extend multiple classes; ClassB and ClassC is not permitted in Java.

At the same time-

public class ClassA implements InterfaceB, InterfaceC 

where InterfaceB and InterfaceC are interfaces that are implemented by the classA is permitted.

Why no multiple inheritance in Java through classes

Multiple inheritance by extending several classes is one feature omitted in the Java language as the designers of the Java language opined that multiple inheritance is a confusing feature and it causes more problems than it solves.

One of the reason given for omitting multiple inheritance in Java is to avoid “diamond problem” which is one of the classic multiple inheritance problem.

Multiple inheritance and Diamond problem

It is best to explain diamond problem with an example so let’s take an example where we have 4 classes. On top of the hierarchy is ClassA which is extended by two classes ClassB and ClassC and there is another class ClassD which extends both ClassB and ClassC. Because of the diamond shaped class structure it is known as diamond problem.

diamond problem in Java

Let’s assume in ClassA there is a method displayGreeting() which is inherited by ClassB and ClassC and they both override it and provide their own implementation of the displayGreeting() method. When ClassD extends both classes ClassB and ClassC there is an ambiguity. Which displayGreeting() method should it inherit or override.

So the ambiguity which multiple inheritance can bring in to parent-child class structure is one reason multiple inheritance is omitted in Java.

Multiple inheritance with interfaces

Java does allow multiple inheritance using several interfaces if not by extending several classes. Though a proper term would be multiple implementation not multiple inheritance as a class implementing interfaces is responsible for providing implementation.

Multiple Inheritance with Interfaces Java Example

There are two interfaces MyInterface1 and MyInterface2 with a method displayGreeting(), there is also a class MyClass which implements both these interfaces. With interfaces, even if there is a similar method in both the interfaces there is no ambiguity as the class that implements provide the implementation.

public interface MyInterface1 {
 public void displayGreeting(String msg);
}
public interface MyInterface2 {
 public void displayGreeting(String msg);
}
public class MyClass implements MyInterface1, MyInterface2{

 public static void main(String[] args) {
  MyClass myClass = new MyClass();
  MyInterface1 myInt1 = myClass;
  MyInterface2 myInt2 = myClass;
  myInt1.displayGreeting("Welcome");
  myInt2.displayGreeting("Hello");
 }

 @Override
 public void displayGreeting(String msg) {
  System.out.println(msg);
 }
}

Output

Welcome
Hello

Back to multiple inheritance ambiguity with default interfaces

In Java 8, interface default methods are added and the inclusion of default methods interfaces may result in multiple inheritance issues.

Let's see it with an example-

Let's assume there are two interfaces MyInterface1 and MyInterface2 and both have default method displayGreeting(). There is a class MyClass which implements both these interfaces MyInterface1 and MyInterface2.

Now consider the scenarios-

  • Which implementation of default method displayGreeting() will be called when MyClass is implementing both interfaces MyInterface1 and MyInterface2 and not overriding the displayGreeting() method.
  • Which implementation of displayGreeting() will be called when MyClass is implementing both interfaces MyInterface1 and MyInterface2 and overriding the displayGreeting() method and providing its own implementation.
  • If interface MyInterface1 is inherited by interface MyInterface2, what will happen in that case?

To handle these kinds of scenarios, Java defines a set of rules for resolving default method conflicts.

  • When class implements both interfaces and both of them have the same default method, also the class is not overriding that method then the error will be thrown.
    "Duplicate default methods named displayGreeting inherited from the interfaces"
  • If implementing class overrides the default method and provides its own functionality for the default method then the method of the class takes priority over the interface default methods.

    As Example, if MyClass provides its own implementation of displayGreeting(), then the overridden method will be called not the default method in MyInterface1 or MyInterface2.

  • In case when an interface extends another interface and both have the same default method, the inheriting interface default method will take precedence. Thus, if interface MyInterface2 extends MyInterface1 then the default method of MyInterface2 will take precedence.
public interface MyInterface1 {
 // default method
 default void displayGreeting(String msg){
  System.out.println("MyInterface1 " + msg);
 }
}
public interface MyInterface2 {
 // default method
 default void displayGreeting(String msg){
  System.out.println("MyInterface2 " + msg);
 }
}
public class MyClass implements MyInterface1, MyInterface2{

 public static void main(String[] args) {
  MyClass myClass = new MyClass();
  MyInterface1 myInt1 = myClass;
  MyInterface2 myInt2 = myClass;
  myInt1.displayGreeting("Welcome");
  myInt2.displayGreeting("Hello");
 }

 @Override
 public void displayGreeting(String msg) {
  System.out.println(msg);
 }
}

Output

Welcome
Hello

Usage of super with default method

There is one more option to use super in order to call default method. If you want to call the default method of any of the interfaces from the implementing class super can be used to resolve the conflict.

If you use the same class structure as above and you want to call the default displayGreeting() method of the MyInterface1 then it can be done as follows-

public class MyClass implements MyInterface1, MyInterface2{

 public static void main(String[] args) {
  MyClass myClass = new MyClass();
  MyInterface1 myInt1 = myClass;
  myInt1.displayGreeting("Welcome");
  /*MyInterface2 myInt2 = myClass;
  
  myInt2.displayGreeting("Hello");*/
 }

 @Override
 public void displayGreeting(String msg) {
   MyInterface1.super.displayGreeting(msg);
 }
}

That's all for this topic Why no Multiple Inheritance in Java. If you have any doubt or any suggestions to make please drop a comment. Thanks!

>>>Return to Java Basics Tutorial Page


Related Topics

  1. Encapsulation in Java
  2. Polymorphism in Java
  3. Abstraction in Java
  4. Inheritance in Java
  5. interface static methods in Java 8

You may also like-

  1. Object Creation Using new Operator in Java
  2. instanceof Operator in Java
  3. Difference Between equals() Method And equality Operator == in Java
  4. String Vs StringBuffer Vs StringBuilder in Java
  5. Difference Between CountDownLatch And CyclicBarrier in Java
  6. Difference between HashMap and ConcurrentHashMap in Java
  7. Why wait(), notify() And notifyAll() Methods Are in Object Class And Not in Thread Class
  8. Externalizable Interface in Java

Saturday, November 26, 2022

Java Lambda Expression And Variable Scope

The body of a lambda expression in Java does not define a new scope; the lambda expression scope is the same as the enclosing scope.

Let's see it with an example, if there is already a declared variable i and lambda expression body declares a local variable i too, that will result in compiler error "Lambda expression's local variable i cannot re-declare another local variable defined in an enclosing scope"

Java lambda expression and variable scope

Effectively Final in Java

When a lambda expression uses an assigned local variable from its enclosing space there is an important restriction; Lambda expression in Java may only use local variable whose value doesn't change. That restriction is referred as "variable capture" which is described as; lambda expression capture values, not variables. The local variables that a lambda expression may use are known as effectively final.

An effectively final variable is one whose value does not change after it is first assigned. There is no need to explicitly declare such a variable as final, although doing so would not be an error.

Let's see it with an example, we have a local variable i which is initialized with the value 7, with in the lambda expression we are trying to change that value by assigning a new value to i. This will result in compiler error- "Local variable i defined in an enclosing scope must be final or effectively final"

lambda expression and variable scope

this() and super() with lambda expression in Java

this and super references with in a lambda expression are the same as in the enclosing context. Since a lambda expression does not define a new scope, the this keyword with in a lambda expression signifies the this parameter of the method where the lambda expression is residing.

@FunctionalInterface
interface IFuncInt {
  int func(int num1, int num2);
  public String toString();
}

public class LambdaVarDemo {
  public static void main(String[] args){                
    LambdaVarDemo lambdaDemo = new LambdaVarDemo();
    lambdaDemo.getResult();
  }
    
  public void getResult(){
    IFuncInt funcInt = (num1, num2) -> {
      System.out.println("calling toString " + this.toString());
      return num1 + num2;        
    };
    System.out.println("Result is " + funcInt.func(6, 7));
  }
    
  @Override
  public String toString() {
    System.out.println("in class LambdaVarDemo toString()" );
    return super.toString();
  }
}

Output

in class LambdaVarDemo toString()
calling toString org.netjs.examples1.LambdaVarDemo@12c9b19
Result is 13

Here it can be seen that the expression this.toString() calls the toString method of the LambdaVarDemo object, not the toString() method of the IFuncInt instance. Please note that a functional interface may have the Object class public methods too in addition to the abstract method.

That's all for this topic Java Lambda Expression And Variable Scope. If you have any doubt or any suggestions to make please drop a comment. Thanks!


Related Topics

  1. Lambda Expressions in Java 8
  2. Functional Interfaces in Java
  3. How to Fix The Target Type of This Expression Must be a Functional Interface Error
  4. Java Lambda Expression And Exception Handling
  5. Java Lambda Expressions Interview Questions

You may also like-

  1. Method Reference in Java
  2. How LinkedList Class Works Internally in Java
  3. How ArrayList Works Internally in Java
  4. Why wait(), notify() And notifyAll() Must be Called Inside a Synchronized Method or Block
  5. Synchronization in Java - Synchronized Method And Block
  6. Best Practices For Exception Handling in Java
  7. Java Abstract Class and Abstract Method
  8. How to Create PDF From XML Using Apache FOP

Friday, November 25, 2022

JavaScript Spread Operator

The JavaScript Spread operator (…) allows an iterable, such as an array or string, to be expanded. In case of an object the spread syntax enumerates the properties of an object (expands properties and corresponding values as key-value pairs).

For example, spread operator when used with an array.

const nums = [1, 2, 3, 4];
console.log(nums);  // displays [1, 2, 3, 4]
console.log(...nums); // displays 1 2 3 4

With the use of spread operator (…nums) array is expanded.

Don't try to spread an object as done in case of array in the above example as that will result in an error because plain objects are not iterable. We'll see later how to use spread operator with objects.

const person = {id: 1, name: 'John', age: 42};
console.log(...person); // ERROR
This results in an error-

Spread syntax requires ...iterable[Symbol.iterator] to be a function

Spread operator examples

There are many places where use of spread operator is very convenient.

1. In function calls

If you want to pass array elements as arguments to a function you can use spread operator to expand array into zero or more arguments.

function sum(a, b, c){
  return a + b + c;
}

const nums = [10, 20, 30];
console.log(sum(...nums)); // 60

2. Creating a new array using an existing array.

With spread operator in JavaScript it is very easy to create a new array using an existing array.

const nums = [3, 4, 5];
const newNums = [1, 2, ...nums, 6]
console.log(newNums); // [1, 2, 3, 4, 5, 6]

3. Copy an array

const nums = [3, 4, 5];
const newNums = [...nums]
console.log(newNums); //[3, 4, 5]

4. Concatenating two or more arrays into a single array.

Again, by using spread operator with arrays that has to be concatenated it becomes quite easy to do it.

let num1 = [1, 2, 3];
const num2 = [4, 5, 6, 7];
num1 = [...num1, ...num2]
console.log(num1); // [1, 2, 3, 4, 5, 6, 7]

Spread operator with objects

You can merge object using spread operator.

const person1 = {id: 1, name: 'John', age: 42};
const person2 = {id: 1, name: 'John', age: 43, city: 'London'};

const mergedObj = {...person1, ...person2}
console.log(mergedObj);

Using Spread operator in React

One usage of spread operator in React is to pass props to a component. For example, suppose you have a Movie component that expects two values: title and genre.

function App() {
  return <Movie title='Dirty Rotten Scoundrels'  genre='comedy'/>
}

Same thing can be written as given below using Spread operator.

function App() {
  const movie = {title: 'Dirty Rotten Scoundrels', genre: 'comedy'};
  return <Movie {...movie} />
}

When you need to pass all the properties of an object to the Child component using spread operator is quite convenient.

That's all for this topic JavaScript Spread Operator. If you have any doubt or any suggestions to make please drop a comment. Thanks!


Related Topics

  1. JavaScript let and const With Examples
  2. JavaScript Arrow Function With Examples
  3. JavaScript Import and Export
  4. JSX in React

You may also like-

  1. Angular Project Structure With File Description
  2. Lambda expressions in Java 8
  3. How HashMap internally works in Java

Thursday, November 24, 2022

React create-react-app Project Structure

In the post Creating a New React Project - create-react-app we saw how to create a React project and how to run the default app which is already generated. If you are wondering what all happened internally to bootstrap your application and how did you get that display that's what is explained in this post

create react app

React project structure in detail

Let's start with understanding the React project structure as generated by using create-react-app.

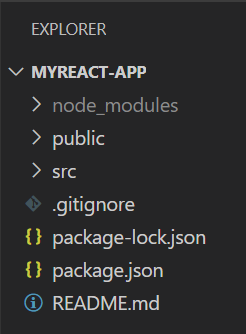
Initial React project structure as created by create-react-app should look like as given below.

React Project Structure

node_modules- This folder contains all the external modules that are needed in your project. The modules or libraries you import in your project should be present inside the node_modules folder.

public- This folder has the most important file- index.html. This is the file browser will display. Another file manifest.json provides metadata about the project like project name, icons which are used, thems and colors.

src- This is the folder that contains our source code for the created app. This is the folder which you will use the most to create components for your React app.

package.json- Lists all the project dependencies with the version. Also lists the scrips that we use to run our app.

README.md- This file lists many useful commands that you can use to run your app and links to some resources about create-react-app.

Running the app (Internal flow)

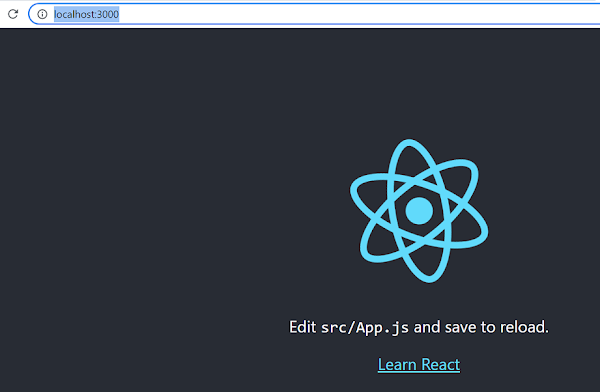
Once the project is created you can run the app using npm start command. After the server has started you can open http://localhost:3000 in your browser to view the application.

Let's try to understand how do you come to this view which is displayed in the browser.

As already stated, it is the public\index.html which is the starting point of the application. If you inspect the code in index.html you will find one <div> element with id as “root”. It is this <div> where your code will be injected.

<!DOCTYPE html>
<html lang="en">
  <head>
    <meta charset="utf-8" />
    <link rel="icon" href="%PUBLIC_URL%/favicon.ico" />
    <meta name="viewport" content="width=device-width, initial-scale=1" />
    <meta name="theme-color" content="#000000" />
    <meta
      name="description"
      content="Web site created using create-react-app"
    />
    <link rel="apple-touch-icon" href="%PUBLIC_URL%/logo192.png" />
    <!--
      manifest.json provides metadata used when your web app is installed on a
      user's mobile device or desktop. See https://developers.google.com/web/fundamentals/web-app-manifest/
    -->
    <link rel="manifest" href="%PUBLIC_URL%/manifest.json" />
    <!--
      Notice the use of %PUBLIC_URL% in the tags above.
      It will be replaced with the URL of the `public` folder during the build.
      Only files inside the `public` folder can be referenced from the HTML.

      Unlike "/favicon.ico" or "favicon.ico", "%PUBLIC_URL%/favicon.ico" will
      work correctly both with client-side routing and a non-root public URL.
      Learn how to configure a non-root public URL by running `npm run build`.
    -->
    <title>React App</title>
  </head>
  <body>
    <noscript>You need to enable JavaScript to run this app.</noscript>
    <div id="root"></div>
    <!--
      This HTML file is a template.
      If you open it directly in the browser, you will see an empty page.

      You can add webfonts, meta tags, or analytics to this file.
      The build step will place the bundled scripts into the <body> tag.

      To begin the development, run `npm start` or `yarn start`.
      To create a production bundle, use `npm run build` or `yarn build`.
    -->
  </body>
</html>

Now, the next thing is how does React know that it has to inject code with in the <div> element with id as root. For that it refers src\index.js

import React from 'react';
import ReactDOM from 'react-dom/client';
import './index.css';
import App from './App';
import reportWebVitals from './reportWebVitals';

const root = ReactDOM.createRoot(document.getElementById('root'));
root.render(
  <React.StrictMode>
    <App />
  </React.StrictMode>
);

// If you want to start measuring performance in your app, pass a function
// to log results (for example: reportWebVitals(console.log))
// or send to an analytics endpoint. Learn more: https://bit.ly/CRA-vitals
reportWebVitals();

ReactDOM.createRoot lets you create a root using the browser DOM node specified as argument. Here the argument is document.getElementById('root') which connects this index.js with index.html.

React renders the App component and the nested components inside root.

root.render(
  <React.StrictMode>
    <App />
  </React.StrictMode>
);

src\App.js has the code that is rendered.

import React from 'react';
import logo from './logo.svg';
import './App.css';

function App() {
  return (
    <div className="App">
      <header className="App-header">
        <img src={logo} className="App-logo" alt="logo" />
        <p>
          Edit <code>src/App.js</code> and save to reload.
        </p>
        <a
          className="App-link"
          href="https://reactjs.org"
          target="_blank"
          rel="noopener noreferrer"
        >
          Learn React
        </a>
      </header>
    </div>
  );
}

export default App

You may have a question how does React know that starting point is index.html and index.js. For that you will have to refer node_modules\react-scripts\config\webpack.config.js which is a configuration file referred by Webpack while bundling the app.

In your React app you may have a number of different types of files (js, css, html) which are "bundled" using tools like Webpack, Rollup or Browserify. Bundling is the process of merging all the files into a single file (bundle.js). This bundle can then be included on a webpage to load an entire app at once. This helps in optimizing the code and increases app performance.

In this configuration file (webpack.config.js) you will find an entry-

// These are the "entry points" to our application.
// This means they will be the "root" imports that are included in JS bundle.
entry: paths.appIndexJs,

Configuration for the mentioned paths is specified in Paths.js file which is at the same location as webpack.config.js. One of the entries in Paths.js is

appIndexJs: c(resolveApp, 'src/index')

The above entry resolves to index.js and that's how the entry point is known.

If you search "index.html" in webpack.config.js you will find a plugin configuration as copied below.

plugins: [
      // Generates an `index.html` file with the <script> injected.
      new HtmlWebpackPlugin(
        Object.assign(
          {},
          {
            inject: true,
            template: paths.appHtml,
          },

In one of the comments in index.html you may see this line-

The build step will place the bundled scripts into the <body> tag.

Which means at run time index.html is re-generated with scripts places into it and that is the file which is actually rendered.

That's all for this topic React create-react-app Project Structure. If you have any doubt or any suggestions to make please drop a comment. Thanks!


Related Topics

  1. JSX in React
  2. React HelloWorld App - First React App
  3. JavaScript Arrow Function With Examples

You may also like-

  1. Angular Project Structure With File Description
  2. Creating New Component in Angular
  3. Installing Docker on Windows
  4. How to Convert Date to String in Java

Wednesday, November 23, 2022

SerialVersionUID And Versioning in Java Serialization

If you ever implemented Serializable interface in Java then you would have seen the warning “The serializable class XXX does not declare a static final serialVersionUID field of type long”. If you ever wondered why this warning about serialVersionUID in your Java code then this post will help to understand it.


SerialVersionUID and versioning

A simple explanation for why do we need to declare serialVersionUID is; it helps with versioning.

Suppose you have some class which is serialized and it changes before it is deserialized. You will need to consider what happens in that situation? Can you allow the new version of your class to read old data.

To help with these versioning scenarios serialization process in Java provides a simple versioning mechanism using serialVersionUID.

Generating serialVersionUID

The stream-unique identifier is a 64-bit hash of the class name, interface class names, methods, and fields. If you are using IDE like eclipse and you have a class that implements Serializable interface then you will get a warning upfront that serialVersionUID is not declared.

Eclipse IDE also gives you options-

  • to add default serialVersionUID
  • OR
  • to add generated serialVersionUID

In case you choose to ignore that warning even then by default serialization mechanism in Java will generate serialVersionUID, both the name of the class and its serialVersionUID are written to the object stream.

During deserialization again serialVersionUID will be generated and compared with the previously written serialVersionUID, if there is a mismatch that means version is changed and InvalidClassException will be thrown.

SerialVersionUID Java example

Let’s try to clear it with an example. Suppose you have a Person class with few fields and you serialize the Person class. Before you try to deserialize the serialized Person object, you add a new field to the Person class.

So here is a Person class with fields like id, name and age. It implements Serializable interface and choose to ignore the warning to declare serialVersionUID.

public class Person implements Serializable{
 private String name;
 private int id;
 private int age;
 // Constructor
 Person(String name, int id, int age){
   System.out.println("In Constructor with args");
   this.name = name;
   this.id = id;
   this.age = age; 
 }
 // no-arg Constructor
 Person(){
   System.out.println("no-arg constructor");
 }
 
 public String getName() {
  return name;
 }
  
 public int getAge() {
  return age;
 }
 public int getId() {
  return id;
 }
}

Util class

This is a class with static methods to serialize and deserialize.

public class Util {
  /**
   * Method used for serialization
   * @param obj
   * @param fileName
   */
  public static void serialzeObject(Object obj, String fileName){
   try(ObjectOutputStream oos = new ObjectOutputStream(new FileOutputStream(new File(fileName)))){
    oos.writeObject(obj);
    
   } catch (FileNotFoundException e) {
    // TODO Auto-generated catch block
    e.printStackTrace();
   } catch (IOException e) {
    // TODO Auto-generated catch block
    e.printStackTrace();
   }
  }
  
  /**
   * Method used for deserializing
   * @param fileName
   * @return
   * @throws ClassNotFoundException
   */
  public static Object deSerialzeObject(String fileName) throws ClassNotFoundException{
   Object obj = null;
   try(ObjectInputStream ois = new ObjectInputStream(new FileInputStream(new File(fileName)))){
    obj = ois.readObject();
    
   } catch (FileNotFoundException e) {
    // TODO Auto-generated catch block
    e.printStackTrace();
   } catch (IOException e) {
    // TODO Auto-generated catch block
    e.printStackTrace();
   }
   return obj;
  }
}

Now I serialize Person class object using the following test class.

public class SerializationDemo {

 public static void main(String[] args) {
  // Creating and initializaing a Person object
    Person person = new Person("User1", 1, 22);
    // file name
    final String fileName = "F://person.ser";
    // serializing
    Util.serialzeObject(person, fileName);
    
    /*try {
     // deserializing
     person = (Person)Util.deSerialzeObject(fileName);
    } catch (ClassNotFoundException e) {
     // TODO Auto-generated catch block
     e.printStackTrace();
    }*/
 }
}

So far so good, Person class object is created and serialized. Now add a new field city to Person class.

public class Person implements Serializable{
 private String name;
 private int id;
 private int age;
 private String city;
 
 // Constructor
 Person(String name, int id, int age){
   System.out.println("In Constructor with args");
   this.name = name;
   this.id = id;
   this.age = age; 
 }
 // no-arg Constructor
 Person(){
   System.out.println("no-arg constructor");
 }
 
 public String getName() {
  return name;
 }
  
 
 public int getAge() {
  return age;
 }
 public int getId() {
  return id;
 }
 public String getCity() {
  return city;
 }
}

Now if I try to deserialize the byte stream which was already created before the inclusion of this new field in Person class InvalidClassException will be thrown.

public class SerializationDemo {
  public static void main(String[] args) {
    // Creating and initializaing a Person object
    Person person = new Person("User1", 1, 22);
    // file name
    final String fileName = "F://person.ser";
    // serializing
    //Util.serialzeObject(person, fileName);
    
    try {
      // deserializing
      person = (Person)Util.deSerialzeObject(fileName);
    } catch (ClassNotFoundException e) {
      // TODO Auto-generated catch block
      e.printStackTrace();
    }
  }
}
java.io.InvalidClassException: org.netjs.prog.Person; local class incompatible: stream classdesc 
serialVersionUID = -4901887311122736183, local class serialVersionUID = -1818819755742473032
 at java.io.ObjectStreamClass.initNonProxy(Unknown Source)
 at java.io.ObjectInputStream.readNonProxyDesc(Unknown Source)
 at java.io.ObjectInputStream.readClassDesc(Unknown Source)
 at java.io.ObjectInputStream.readOrdinaryObject(Unknown Source)
 at java.io.ObjectInputStream.readObject0(Unknown Source)
 at java.io.ObjectInputStream.readObject(Unknown Source)
 at org.netjs.prog.Util.deSerialzeObject(Util.java:39)
 at org.netjs.prog.SerializationDemo.main(SerializationDemo.java:15)

Here note that even if you chose to ignore the warning and didn’t declare the serialVersionUID it is still generated. You can see that 2 different serialVersionUIDs are there as the class has changed and that mismatch has caused the InvalidClassException.

Assigning serialVersionUID to Java class

As shown in the above example if you choose to ignore the warning and rely on generation of serialVersionUID by the serialization mechanism itself it will always fail if there is a change in the class.

That’s why you as an implementor of the class should take charge and assign a serialVersionUID yourself (If you are using IDE like Eclipse that can be generated by Eclipse for you or you can use serialver tool which comes with the JDK to generate serialVersionUID).

With you taking charge when you know your class has changed in a way that it is not compatible with the old version anymore you can choose to change the serialVersionUID. In that case during deserialization because of the non-matching serialVersionUID, InvalidClassException will be thrown.

If you choose not to change the serialVersionUID even if your class has changed as you think the change is not significant then deserialization will proceed with out throwing any exception.

Let’s take the same example as above but this time serialVersionUID is declared.

Person class

public class Person implements Serializable{
 private static final long serialVersionUID = -4046333379855427853L;
 private String name;
 private int id;
 private int age;
 /*private String city;
 public String getCity() {
  return city;
 }*/
 // Constructor
 Person(String name, int id, int age){
   System.out.println("In Constructor with args");
   this.name = name;
   this.id = id;
   this.age = age; 
 }
 // no-arg Constructor
 Person(){
   System.out.println("no-arg constructor");
 }
 
 public String getName() {
  return name;
 }
   
 public int getAge() {
  return age;
 }
 public int getId() {
  return id;
 }
}

Now the class is serialized.

public class SerializationDemo {

 public static void main(String[] args) {
  // Creating and initializaing a Person object
    Person person = new Person("User1", 1, 22);
    // file name
    final String fileName = "F://person.ser";
    // serializing
    //Util.serialzeObject(person, fileName);
    
    /*try {
     // deserializing
     person = (Person)Util.deSerialzeObject(fileName);
     System.out.println("id " + person.getId() + " Name "+ person.getName() 
       + " Age " + person.getAge() + " City " + person.getCity());
    } catch (ClassNotFoundException e) {
     // TODO Auto-generated catch block
     e.printStackTrace();
    }*/
 }
}

Now a new field city is added in the Person class but the serialVersionUID remains same as before.

public class Person implements Serializable{

 private static final long serialVersionUID = -4046333379855427853L;
 private String name;
 private int id;
 private int age;
 private String city;
 public String getCity() {
  return city;
 }
 // Constructor
 Person(String name, int id, int age){
   System.out.println("In Constructor with args");
   this.name = name;
   this.id = id;
   this.age = age; 
 }
 // no-arg Constructor
 Person(){
   System.out.println("no-arg constructor");
 }
 
 public String getName() {
  return name;
 }
   
 public int getAge() {
  return age;
 }
 public int getId() {
  return id;
 }
}

Now deserialization will happen though there won’t be any value for the city field.

public class SerializationDemo {

 public static void main(String[] args) {
  // Creating and initializaing a Person object
    Person person = new Person("User1", 1, 22);
    // file name
    final String fileName = "F://person.ser";
    // serializing
    //Util.serialzeObject(person, fileName);
    
    try {
     // deserializing
     person = (Person)Util.deSerialzeObject(fileName);
     System.out.println("id " + person.getId() + " Name "+ person.getName() 
       + " Age " + person.getAge() + " City " + person.getCity());
    } catch (ClassNotFoundException e) {
     // TODO Auto-generated catch block
     e.printStackTrace();
    }
 }
}

Output

In Constructor with args
id 1 Name User1 Age 22 City null

For test you can regenerate the serialVersionUID of the Person class after adding city field. In that case deserialization will fail as there will be a mismatch between serialVersionUIDs.

Points to remember

  1. serialVersionUID is used for versioning of the serialized streams. During serialization process serialVersionUID is also stored. During deserialization generated serialVersionUID is matched with the stored one and if there is a mismatch process fails.
  2. serialVersionUID is a 64-bit hash of the class name, interface class names, methods, and fields. If you don’t declare one yourself serialization process will still generate serialVersionUID. In that case it will fail for any change in the class.
  3. If you declare the serialVersionUID that gives you control over the versioning. When you think class has grown in way that is not compatible with the previous versions then you can change the serialVersionUID. If you think change in the class are not significant enough to change the serialVersionUID you may choose to retain the same serialVersionUID. In that case serialization and deserialization will not fail even if your class had changed.
  4. serialVersionUID is declared as a private static final long and it is always better to declare one in order to have control over the versioning of the class.

That's all for this topic SerialVersionUID And Versioning in Java Serialization. If you have any doubt or any suggestions to make please drop a comment. Thanks!

>>>Return to Java Advanced Tutorial Page


Related Topics

  1. Serialization and Deserialization in Java
  2. Transient Keyword in Java With Examples
  3. Externalizable Interface in Java
  4. Serialization Proxy Pattern in Java
  5. Marker interface in Java

You may also like-

  1. How HashSet Works Internally in Java
  2. Fail-Fast Vs Fail-Safe Iterator in Java
  3. Java Phaser With Examples
  4. Java ReentrantReadWriteLock With Examples
  5. Java Stream API Tutorial
  6. Lambda Expressions in Java 8
  7. Type Wrapper Classes in Java
  8. Try-With-Resources in Java With Examples

Tuesday, November 22, 2022

Serialization Proxy Pattern in Java

When you serialize an object in Java it is converted to byte stream and object is reconstituted using that byte stream during the process of deserialization. Sometimes this extraneous behavior of creating object using the byte stream is not what you want and you still want constructor (or any other method if required) to be called when your object is created during the process of deserialization.

In a scenario like this you can use serialization proxy pattern where you serialize a proxy object rather than the real object, at the time of deserialization using that proxy object you can create the real object by calling the constructor (or any other required method).

Serialization proxy pattern

Serialization proxy pattern is a way to design your class where proxy pattern defines its serialization mechanism.

Before going into any more details about serialization proxy pattern in Java let’s know about two methods.

  • writeReplace()
  • readResolve()

writeReplace() method in Java

Serializable classes that use an alternative object (proxy object) when writing an object to the stream should implement writeReplace() method with the exact signature:

ANY-ACCESS-MODIFIER Object writeReplace() throws ObjectStreamException;

This writeReplace() method is invoked by serialization if the method exists and this method is defined within the original class whose object is serialized. Thus, the method can have private, protected and package-private access modifier.

readResolve() method in Java

Classes that need to provide a replacement object when the serialized object is read from the stream should implement readResolve() method with the exact signature.

 ANY-ACCESS-MODIFIER Object readResolve() throws ObjectStreamException;

This readResolve() method follows the same invocation rules and accessibility rules as writeReplace.

How Serialization Proxy pattern works in Java

Rather than serializing the original class you provide functionality using the writeReplace() method to serialize the proxy class instead. Here note that writeReplace() method is implemented in the original class.

At the time of deserialization proxy object is deserialized and then the readResolve() method is called. That’s where you will have to provide the functionality to create the original class object regular way. Here note that readResolve() method is implemented in the proxy class.

Proxy class

Generally serialization proxy pattern is implemented by creating a proxy class as a nested static class with in the original class. Since it needs access to the fields of the outer class so that it is better to create proxy class as a nested class.

Serialization proxy pattern example

Time is right to see an example of the serialization proxy pattern in Java. Here we have a Person class which has a constructor with args. When a Person class object is created it is initialized using this constructor and that’s what you want to do when you deseliarize a serialized Person class object.

For doing that you will use Serialization proxy pattern and create a proxy class (called PersonProxy here) as a nested static class. You will also implement writeReplace() and readResolve() methods.

Person class

import java.io.Serializable;

public class Person implements Serializable{
 
 private static final long serialVersionUID = 9140203997753929147L;
 private String name;
 private int id;
 private int age;
 
 // Constructor
 Person(String name, int id, int age){
   System.out.println("In Constructor with args");
   this.name = name;
   this.id = id;
   this.age = age; 
 }
 // no-arg Constructor
 Person(){
   System.out.println("no-arg constructor");
 }
 
 public String getName() {
  return name;
 }
  
 public int getAge() {
  return age;
 }
 public int getId() {
  return id;
 }
 /**
  * writeReplace method for the proxy pattern
  * @return
  */
 private Object writeReplace() {
  System.out.println("In writeReplace() method");
  return new PersonProxy(this);
 }
 // Nested static class - Proxy
 private static class PersonProxy implements Serializable {

  private static final long serialVersionUID = -5965328891170223339L;
  private String name;
  private int id;
  private int age;
  PersonProxy(Person p) {
   this.name = p.name;
   this.id = p.id;
   this.age = p.age;
  }
  // readResolve method for Person.PersonProxy
  private Object readResolve() {
   System.out.println("In readResolve() method");
   return new Person(name, id, age); // Uses public constructor
  } 
 }
}

Util class

A util class with methods to serialize and deserialize.

import java.io.File;
import java.io.FileInputStream;
import java.io.FileNotFoundException;
import java.io.FileOutputStream;
import java.io.IOException;
import java.io.ObjectInputStream;
import java.io.ObjectOutputStream;

public class Util {
  /**
   * Method used for serialization
   * @param obj
   * @param fileName
   */
  public static void serialzeObject(Object obj, String fileName){
   try(ObjectOutputStream oos = new ObjectOutputStream(new FileOutputStream(new File(fileName)))){
    oos.writeObject(obj);
    
   } catch (FileNotFoundException e) {
    // TODO Auto-generated catch block
    e.printStackTrace();
   } catch (IOException e) {
    // TODO Auto-generated catch block
    e.printStackTrace();
   }
  }
  
  /**
   * Method used for deserializing
   * @param fileName
   * @return
   * @throws ClassNotFoundException
   */
  public static Object deSerialzeObject(String fileName) throws ClassNotFoundException{
   Object obj = null;
   try(ObjectInputStream ois = new ObjectInputStream(new FileInputStream(new File(fileName)))){
    obj = ois.readObject();
    
   } catch (FileNotFoundException e) {
    // TODO Auto-generated catch block
    e.printStackTrace();
   } catch (IOException e) {
    // TODO Auto-generated catch block
    e.printStackTrace();
   }
   return obj;
  }
}

SerializationDemo class

Using this class a Person class object will be serialized and later deserialized.

public class SerializationDemo {

 public static void main(String[] args) {
  // Creating and initializaing a Person object
    Person person = new Person("User1", 1, 22);
    // file name
    final String fileName = "F://person.ser";
    System.out.println("About to serialize ....");
    // serializing
    Util.serialzeObject(person, fileName);
    
    try {
     System.out.println("About to deserialize ....");
     // deserializing
     person = (Person)Util.deSerialzeObject(fileName);
     System.out.println("id " + person.getId() + " Name "+ person.getName() 
       + " Age " + person.getAge());
    } catch (ClassNotFoundException e) {
     // TODO Auto-generated catch block
     e.printStackTrace();
    }
 }
}

Output

In Constructor with args
About to serialize ....
In writeReplace() method
About to deserialize ....
In readResolve() method
In Constructor with args
id 1 Name User1 Age 22

Here you can see that writeReplace() method is called when object is serialized. At the time of deserializing the object readResolve() method is called where object is created and initialized using the constructor of the class not just recreated using the byte stream.

Creating instance by getting data from DB

Another serialization proxy pattern usage example, which you will see in many frameworks too is when you want your instance to be created using a DB call. In that case what you need to serialize is some identifier only and during deserialization using that identifier you will get the data to construct the object from DB.

Here you have a Person class with fields as id, name etc. In writeReplace() method where you serialize the proxy you provide the id also.

Person class

public class Person implements Serializable {
 private int id;
 private String name;
 …
 private Object writeReplace() {
  return new PersonProxy(id);
 }
}

Proxy Class

In the readResolve() method of the proxy class you create the Person class instance using the id which you saved earlier.

public class PersonProxy implements Serializable {
 private int id;
 public PersonProxy(int id) {
  this.id = id;
 }
 public Object readResolve() {
  // DB call to get the person record by id
  return PersonDAO.findById(id);
 }
}

That's all for this topic Serialization Proxy pattern in Java. If you have any doubt or any suggestions to make please drop a comment. Thanks!

>>>Return to Java Advanced Tutorial Page


Related Topics

  1. Transient in Java
  2. Externalizable Interface in Java
  3. SerialVersionUID And Versioning in Java Serialization
  4. Serialization and Deserialization in Java
  5. Spring NamedParameterJdbcTemplate Insert, Update And Delete Example

You may also like-

  1. @FunctionalInterface Annotation in Java
  2. Spliterator in Java
  3. Type Erasure in Java Generics
  4. Java ThreadLocal Class With Examples
  5. Java BlockingDeque With Examples
  6. Multi-Catch Statement in Java Exception Handling
  7. BigDecimal in Java With Examples
  8. Java Program to Find The Longest Palindrome in a Given String

Monday, November 21, 2022

React HelloWorld App - First React App

As a tradition whenever you start learning any new framework or programming language you start with a Hello World program. In this tutorial we'll see how to create first React app which is going to be a Hello World React app.


Generate React Project using Create React App

If you want to create a React project named myreact-app go to the folder where you want to create this project and run the following command.

npx create-react-app myreact-app

This command takes care of installing all the required packages, creating a React project structure with all the proper configuration so that we can start writing components.

Read more about Create React App in this post- Creating a New React Project - create-react-app

Running default app

Once project is created change directory to the created project folder.

cd myreact-app

Then run following command to run the app in development mode. This command compiles the app and start the development server.

npm start

If there is no error then it should automatically run the application in your browser or once you see the application is successfully compiled open the browser and type URL- http://localhost:3000/ to see the default application.

React default app

So, create-react-app generates a React project, even has some generated code which you can run and verify that everything it fine with your project. If everything has gone as expected let's make changes in the project to display Hello World.

HelloWorld React application

It will be easy for you to see the project structure and create new files or edit existing files if you are using an editor. Visual Studio Code is a preferred editor for React development so we'll use that.

Open Visual Studio Code and select Open folder. Select the created myreact-app folder to open it.

In the project there will be a App.js file with in the src folder.

React App Structure

App.js file has the code that displays the default view.

import React from 'react';
import logo from './logo.svg';
import './App.css';

function App() {
  return (
    <div className="App">
      <header className="App-header">
        <img src={logo} className="App-logo" alt="logo" />
        <p>
          Edit <code>src/App.js</code> and save to reload.
        </p>
        <a
          className="App-link"
          href="https://reactjs.org"
          target="_blank"
          rel="noopener noreferrer"
        >
          Learn React
        </a>
      </header>
    </div>
  );
}

export default App

Since we are going to write our own code now, so delete the code in App.js and replace it with the following code.

function App() {
  return (
    <div className="App">
      <h2>Hello World from React</h2>
    </div>
  );
}

export default App;

Because of hot reloading any changes you have made in the code will automatically refresh the app in the browser to reflect those changes. So, you should see "Hello World from React" displayed.

Creating HelloWorld Component

In React you will create many components which taken as a whole define your application. Making changes in App.js to display Hello World is ok but not a true reflection of how you will actually develop your app in React. So, now we'll create a HelloWorld component that does the job of displaying Hello World.

In React, components come in two types

  1. Functional components- Written as Java Script functions. Functional component with React hooks is the preferred way to write React code now.
  2. Class components- Written as a ES6 class that extends from React.Component

HelloWorld component as a functional component

In the src folder of your project create a new folder named 'Components' and with in that a sub-folder named 'Hello-World'. With in 'Hello-World' folder create a new file named 'HelloWorld.js'.

In HelloWorld.js write the following code.

const HelloWorld = () => {
    return <h2>Hello World from React</h2>
}
export default HelloWorld;

Some points to note here are-

  1. Custom component name is always written in title case in React.
  2. Functional component is just a Java Script function and here it is written as an arrow function.
  3. In React you use JSX which is a syntax extension for JavaScript that lets you write HTML-like markup with in a JavaScript file. Read more about JSX in this post- JSX in React
  4. You need to export your component so that it can be imported into other componenects with the import declaration.

The components you write are effectively React elements which means you can use these components by wrapping them inside a tag just like HTML tags. If you want to use your HelloWorld component inside App component that's how you can do it.

import HelloWorld from "./Components/Hello-World/HelloWorld";

function App() {
  return (
    <div className="App">
      <HelloWorld />
    </div>
  );
}

export default App;

Some points to note here are-

  1. You need to import components before using them in other React components.
  2. You can use component by wrapping it inside a tag. <HelloWorld />

With these changes you should now see your custom HelloWorld component being rendered.

React Hello World Example

HelloWorld component as a class component

If you want to write HelloWorld component as a class component then create a new file named HelloWorldClass.js inside HelloWorld folder and write the following code.

import React from "react";

class HelloWorldClass extends React.Component {
  render() {
    return <h2>Hello World From React ClassComponent</h2>;
  }
}
export default HelloWorldClass;

Some points to note here are-

  1. A class component is an ECMAScript 6 (ES6) JavaScript class.
  2. Class components extend from the React.Component class.
  3. The render() method is required in a React.Component subclass and used to return an HTML element.

In order to render HelloWorldClass component change the import and tag in App.js file.

import HelloWorldClass from "./Components/Hello-World/HelloWorldClass";

function App() {
  return (
    <div className="App">
      <HelloWorldClass />
    </div>
  );
}

export default App;

That's all for this topic React HelloWorld App - First React App. If you have any doubt or any suggestions to make please drop a comment. Thanks!


Related Topics

  1. Creating a New React Project - create-react-app
  2. React Declarative Approach

You may also like-

  1. Angular Application Bootstrap Process
  2. Difference Between throw And throws in Java
  3. How ArrayList Works Internally in Java
  4. Spring MVC Exception Handling Tutorial

Sunday, November 20, 2022

Java BufferedWriter Class With Examples

Java BufferedWriter class is used to write text to a character-output stream. This class is used as a wrapper around any Writer (FileWriter and OutputStreamWriter) whose write() operations may be costly. java.io.BufferedWriter makes the write operation more efficient by buffering characters so as to provide for the efficient writing of single characters, arrays, and strings. Without buffering, each invocation of a print() method would cause characters to be converted into bytes that would then be written immediately to the file, which can be very inefficient.

Java BufferedWriter constructors

  • BufferedWriter(Writer out)- Wraps the passed Writer and creates a buffering character-input stream that uses a default-sized input buffer. Default buffer size for BufferedWriter is 8192 bytes i.e. 8 KB.

    For example-

     BufferedWriter out = new BufferedWriter(new FileWriter("resources/abc.txt"));
     
  • BufferedWriter(Writer out, int sz)- Wraps the passed Writer and creates a new buffered character-output stream that uses an output buffer of the given size.

Java BufferedWriter methods

Methods in BufferedWriter class are as given below-

  • flush()- Flushes the stream.
  • newLine()- Writes a line separator.
  • write(int c)- Writes a single character.
  • write(char[] cbuf, int off, int len)- Writes a portion of an array of characters. Parameter off is the offset from which to start reading characters and parameter len is the number of characters to write.
  • write(String s, int off, int len)- Writes a portion of a String. Parameter off is the offset from which to start reading characters and parameter len is the number of characters to write.

Java BufferedWriter examples

For using BufferedWriter steps are as follows-

  1. Create an instance of BufferedWriter wrapped around another Writer.
  2. Using that instance to write to a file.
  3. Close the stream, you should close the resources in finally block or you can use try-with-resources to automatically manage resources.

1. Using write(int c) method of the Java BufferedWriter class to write single character to a file.

import java.io.BufferedWriter;
import java.io.FileWriter;
import java.io.IOException;

public class FileWriteRW {
  public static void main(String[] args) throws IOException {
    try (BufferedWriter bw = new BufferedWriter(new FileWriter("F:\\Temp\\write.txt"))){
      bw.write(65); //writes A
      bw.write(66); //writes B
      bw.write(67); //writes C
    }
  }
}

2. Using write(char[] cbuf, int off, int len) method of the Java BufferedWriter class to write portion of a character array.

import java.io.BufferedWriter;
import java.io.FileWriter;
import java.io.IOException;

public class FileWriteRW {
  public static void main(String[] args) throws IOException {
    String str = "This is a test String";
    char[] buffer = str.toCharArray();
    try (BufferedWriter bw = new BufferedWriter(new FileWriter("F:\\Temp\\write.txt"))){
      bw.write(buffer, 0, 7);// takes portion from index 0..6
    }
  }
}

3. Using write(String s, int off, int len) of the Java BufferedWriter class to write a portion of a String.

public class FileWriteRW {
  public static void main(String[] args) throws IOException {
    String str = "This is a test String";
    try (BufferedWriter bw = new BufferedWriter(new FileWriter("F:\\Temp\\write.txt"))){
      bw.write(str, 0, 7);// takes substring from index 0..6
    }
  }
}

4. Using newLine() method of the Java BufferedWriter class.

public class FileWriteRW {
  public static void main(String[] args) throws IOException {
    String str = "This is a test String";
    try (BufferedWriter bw = new BufferedWriter(new FileWriter("F:\\Temp\\write.txt"))){
      bw.write(str, 0, 7);// takes substring from index 0..6
      bw.newLine(); // new line
      bw.write(str, 7, str.length()-7);
      bw.flush(); // flushes the stream
    }
  }
}

That's all for this topic Java BufferedWriter Class With Examples. If you have any doubt or any suggestions to make please drop a comment. Thanks!

>>>Return to Java Advanced Tutorial Page


Related Topics

  1. Character Streams in Java IO
  2. Byte Streams in Java IO
  3. Write to a File in Java
  4. How to Append to a File in Java
  5. Reading File in Java Using Files.lines And Files.newBufferedReader

You may also like-

  1. How to Read File From The Last Line in Java
  2. Difference Between Thread And Process in Java
  3. LinkedHashSet in Java With Examples
  4. String Vs StringBuffer Vs StringBuilder in Java
  5. Constructor Overloading in Java
  6. Python Program to Display Fibonacci Series
  7. Spring MVC Exception Handling Example Using @ExceptionHandler And @ControllerAdvice
  8. Lazy Initialization in Spring Using lazy-init And @Lazy Annotation