Thursday, November 9, 2023

How to Compress Intermediate Map Output in Hadoop

In order to speed up the MaReduce job it is helpful to compress the map output in Hadoop.

Since output of the map phase is-

  1. Stored to disk.
  2. Mapper output is transferred to the reducers on different nodes as their input.

Thus compressing the map output helps in both-

  1. Saving the storage (reducing the IO) while storing map output.
  2. Reduces the amount of data transferred to reducers.

It is better to use a fast compressor like Snappy, LZO or LZ4 to compress map output in Hadoop as higher compression ratio would mean more time to compress. Moreover compressed output is splittable or not does not matter when compressing intermediate map output.

Configuration parameters for compressing map output

You can set configuration parameters for the whole cluster so that all the jobs running on the cluster compress the map output. You can also opt to do it for individual MapReduce jobs.

As example- If you want to set snappy as the compression format for the map output at the cluster level then you need to set the following properties in mapred-site.xml:

<property>
  <name>mapreduce.map.output.compress</name>
  <value>true</value>
</property>
<property>
  <name>mapreduce.map.output.compress.codec</name>
  <value>org.apache.hadoop.io.compress.SnappyCodec</value>
</property>

If you want to set it for jobs individually then you need to set following properties with in your MapReduce program-

Configuration conf = new Configuration();
conf.setBoolean("mapreduce.map.output.compress", true);
conf.set("mapreduce.map.output.compress.codec", "org.apache.hadoop.io.compress.SnappyCodec");

That's all for this topic How to Compress Intermediate Map Output in Hadoop. If you have any doubt or any suggestions to make please drop a comment. Thanks!

>>>Return to Hadoop Framework Tutorial Page


Related Topics

  1. How to Compress MapReduce Job Output in Hadoop
  2. Data Compression in Hadoop
  3. Compressing File in bzip2 Format in Hadoop - Java Program
  4. Word Count MapReduce Program in Hadoop
  5. What is SafeMode in Hadoop

You may also like-

  1. MapReduce Flow in YARN
  2. Speculative Execution in Hadoop
  3. Data Locality in Hadoop
  4. What is HDFS
  5. instanceof Operator in Java
  6. How to Run a Shell Script From Java Program
  7. Creating Tar File And GZipping Multiple Files - Java Program
  8. Java Multi-Threading Interview Questions

Wednesday, November 8, 2023

Compressing File in snappy Format in Hadoop - Java Program

This post shows how to compress an input file in snappy format in Hadoop using Java API. The Java program will read input file from the local file system and copy it to HDFS in compressed snappy format. Input file is large enough (more than 128 MB even after compression) so that it is stored as more than one HDFS block. That way you can also see that the file is splittable or not when used in a MapReduce job. Note here that snappy format is not a splittable compression format so MapReduce job will create only a single split for the whole data.

Java program to compress file in snappy format

As explained in the post Data Compression in Hadoop, there are different codec (compressor/decompressor) classes for different compression formats. Codec class for snappy compression format is “ org.apache.hadoop.io.compress.SnappyCodec”.

import java.io.BufferedInputStream;
import java.io.FileInputStream;
import java.io.IOException;
import java.io.InputStream;
import java.io.OutputStream;

import org.apache.hadoop.conf.Configuration;
import org.apache.hadoop.fs.FileSystem;
import org.apache.hadoop.fs.Path;
import org.apache.hadoop.io.IOUtils;
import org.apache.hadoop.io.compress.CompressionCodec;
import org.apache.hadoop.io.compress.CompressionCodecFactory;
import org.apache.hadoop.io.compress.CompressionOutputStream;

public class SnappyCompress {
 public static void main(String[] args) {
  Configuration conf = new Configuration();
  InputStream in = null;
  OutputStream out = null;
  try {
   FileSystem fs = FileSystem.get(conf);
   // Input file - local file system
   in = new BufferedInputStream(new FileInputStream("/netjs/Hadoop/Data/log.txt"));
   // Output file path in HDFS
   Path outFile = new Path("/user/out/test.snappy");
   // Verifying if the output file already exists
   if (fs.exists(outFile)) {
    throw new IOException("Output file already exists");
   }
   
   out = fs.create(outFile);
   
   // snappy compression 
   CompressionCodecFactory factory = new CompressionCodecFactory(conf);
   CompressionCodec codec = factory.getCodecByClassName
    ("org.apache.hadoop.io.compress.SnappyCodec");
   CompressionOutputStream compressionOutputStream = codec.createOutputStream(out);
   
   try {
    IOUtils.copyBytes(in, compressionOutputStream, 4096, false);
    compressionOutputStream.finish();
    
   } finally {
    IOUtils.closeStream(in);
    IOUtils.closeStream(compressionOutputStream);
   }
   
  } catch (IOException e) {
   e.printStackTrace();
  }
 }
}
    

To run this Java program in Hadoop environment export the class path where your .class file for the Java program resides.

$ export HADOOP_CLASSPATH=/home/netjs/eclipse-workspace/bin 

Then you can run the Java program using the following command.

$ hadoop org.netjs.SnappyCompress

18/04/24 15:49:41 INFO lzo.GPLNativeCodeLoader: Loaded native gpl library from the embedded binaries
18/04/24 15:49:41 INFO compress.CodecPool: Got brand-new compressor [.snappy]

Once the program is successfully executed you can check the number of HDFS blocks created by running the hdfs fsck command.

$ hdfs fsck /user/out/test.snappy

 Total size: 419688027 B
 Total dirs: 0
 Total files: 1
 Total symlinks:  0
 Total blocks (validated): 4 (avg. block size 104922006 B)
 Minimally replicated blocks: 4 (100.0 %)
 Over-replicated blocks: 0 (0.0 %)
 Under-replicated blocks: 0 (0.0 %)
 Mis-replicated blocks:  0 (0.0 %)
 Default replication factor: 1
 Average block replication: 1.0
 Corrupt blocks:  0
 Missing replicas:  0 (0.0 %)
 Number of data-nodes:  1
 Number of racks:  1
FSCK ended at Tue Apr 24 15:52:09 IST 2018 in 5 milliseconds

As you can see there are 4 HDFS blocks.

Now you can give this compressed file test.snapy as input to a wordcount MapReduce program. Since the compression format used is snappy, which is not splittable, there will be only one input split though there are 4 HDFS blocks.

$ hadoop jar /home/netjs/wordcount.jar org.netjs.WordCount /user/out/test.snappy /user/mapout1

18/04/24 15:54:44 INFO client.RMProxy: Connecting to ResourceManager at /0.0.0.0:8032
18/04/24 15:54:45 WARN mapreduce.JobResourceUploader: Hadoop command-line option parsing not performed. Implement the Tool interface and execute your application with ToolRunner to remedy this.
18/04/24 15:54:46 INFO input.FileInputFormat: Total input files to process : 1
18/04/24 15:54:46 INFO lzo.GPLNativeCodeLoader: Loaded native gpl library from the embedded binaries

18/04/24 15:54:46 INFO mapreduce.JobSubmitter: number of splits:1

18/04/24 15:54:46 INFO mapreduce.JobSubmitter: Submitting tokens for job: job_1524565091782_0001
18/04/24 15:54:47 INFO impl.YarnClientImpl: Submitted application application_1524565091782_0001
You can see from the console message that only one input split is created for the MapReduce job.

That's all for this topic Compressing File in snappy Format in Hadoop - Java Program. If you have any doubt or any suggestions to make please drop a comment. Thanks!

>>>Return to Hadoop Framework Tutorial Page


Related Topics

  1. How to Compress Intermediate Map Output in Hadoop
  2. How to Compress MapReduce Job Output in Hadoop
  3. Java Program to Read File in HDFS
  4. Replica Placement Policy in Hadoop Framework
  5. What is SafeMode in Hadoop

You may also like-

  1. Word Count MapReduce Program in Hadoop
  2. MapReduce Flow in YARN
  3. Data Locality in Hadoop
  4. HDFS Commands Reference List
  5. Capacity Scheduler in YARN
  6. Lock Striping in Java Concurrency
  7. Creating Tar File And GZipping Multiple Files - Java Program
  8. Zipping Files in Java

Tuesday, November 7, 2023

What is Hadoop Distributed File System (HDFS)

When you store a file it is divided into blocks of fixed size, in case of local file system these blocks are stored in a single system. In a distributed file system these blocks of the file are stored in different systems across the cluster. Hadoop framework has its own distributed file system known as Hadoop Distributed File System (HDFS) for handling huge files.


Hadoop Distributed File System

HDFS is designed to support large files, by large here we mean file size in gigabytes to terabytes. HDFS is also designed to run on commodity hardware, working in parallel.

With this design what you expect from HDFS is-
  1. Fault tolerance. Since low cost hardware (commodity hardware) is used in the cluster so chance of a node going dysfunctional is high. Also a block of data may be corrupted. So detection of faults and quick, automatic recovery from them is a core architectural goal of HDFS.
  2. Since blocks of file are stored across the cluster so aggregate band width should be high.
  3. HDFS should be able to scale to hundreds of nodes in a single cluster.

What is HDFS block size

As already stated file is divided into several blocks for storage. The block is amount of data that you read or write from a file system. In local file system block size is generally small. For example in Windows OS block size is 4 KB.

Since HDFS works on large data sets which are stored across nodes in a cluster having a small block size will create problems. While reading the file a lot of time will be spent on searching the nodes where blocks reside, connecting to the nodes and looking for that block in the drive of that node. In order to make the time spent on these activities negligible in comparison to the amount of data read the block size is comparatively larger in HDFS.

Block size is 128 MB by default in Hadoop 3.x versions (same as Hadoop 2.x), it was 64 MB in Hadoop 1.x versions.

As example- If you have file of size 200 MB then it will be split into two blocks of 128 MB and 72 MB respectively. Then these blocks will be stored on different machines in the cluster.

Note here that if file split is smaller than the block size then it won’t occupy the whole block size in the drive. The split whose size is 72 MB will take only 72 MB disk space not the whole 128 MB.

Changing the HDFS block size property

If you want to change the default block size of 128 MB in Hadoop you can edit the /etc/hadoop/hdfs-site.xml file in your hadoop installation directory.

The property you need to change is dfs.block.size.

<property> 
  <name>dfs.block.size<name> 
  <value>134217728<value> 
  <description>HDFS block size<description> 
</property>

Note that block size is given in bits here- 128 MB = 128 * 1024 * 1024

HDFS Architecture - NameNode and DataNode

HDFS follows a master/slave architecture. In An HDFS cluster there is a single NameNode, a master server that manages the file system namespace and regulates access to files by clients.

DataNode runs on every node in the cluster, datanodes manage storage attached to the nodes that they run on.

Metadata about the file is stored by the NameNode. It also determines the mapping of blocks to DataNodes. File system namespace operations like opening, closing, and renaming files and directories are executed by NameNode.

Actual data of the file is stored in Datanodes. DataNodes are responsible for serving read and write requests from the file system’s clients.

HDFS design features

Some of the design features of HDFS and what are the scenarios where HDFS can be used because of these design features are as follows-

1. Streaming data access- HDFS is designed for streaming data access i.e. data is read continuously. HDFS is more suitable for batch processing rather than interactive use by users. The emphasis is on high throughput of data access rather than low latency of data access.
Having large block size helps here as the seek time to the start of the block in the drive is negligible in comparison to the data read.

2. Single coherency model- HDFS is designed with an idea that files will be written once and then read many times. So a file in HDFS once stored can't be modified arbitrarily. You can't have random writes in the file. Though appends and truncates are permitted, you can only append at the end of the file not at any arbitrary point.

HDFS replication

When you store data blocks across a cluster of commodity hardware then there is a high chance of the node in a node going dysfunctional, data block getting corrupted or a no connection to a node because of network problem. HDFS has to fault tolerant and highly available despite these challenges. One of the way these features are ensured is through replication of data.

In HDFS, by default, each block is replicated thrice. So, each file split will be stored in three different DataNodes. For selecting these DataNodes Hadoop framework has a replica placement policy.

With this replication mechanism in place, if a DataNode storing a particular is dysfunctional another DataNode having that redundant block can be used instead.

As Example – There are two files A.txt and B.txt which are stored in a cluster having 5 nodes. When these files are put in HDFS, as per the applicable block size, let's say both of these files are divided into two blocks.

A.txt – block-1, block-2
B.txt – block-3, block-4
With the default replication factor of 3, block replication across 5 DataNodes can be depicted as follows–
HDFS replication

Changing the default replication factor in Hadoop

If you want to change the default replication factor of 3 in Hadoop you will have to edit the /etc/hadoop/hdfs-site.xml in your hadoop installation directory.

The property you need to change is dfs.replication.

<property>
  <name>dfs.replication</name>
  <value>3</value>
</property>

That's all for this topic What is Hadoop Distributed File System (HDFS). If you have any doubt or any suggestions to make please drop a comment. Thanks!

>>>Return to Hadoop Framework Tutorial Page


Related Topics

  1. Introduction to Hadoop Framework
  2. Replica Placement Policy in Hadoop Framework
  3. NameNode, DataNode And Secondary NameNode in HDFS
  4. HDFS Commands Reference List
  5. HDFS High Availability

You may also like-

  1. What is Big Data
  2. Installing Hadoop on a Single Node Cluster in Pseudo-Distributed Mode
  3. Installing Ubuntu Along With Windows
  4. Word Count MapReduce Program in Hadoop
  5. File Write in HDFS - Hadoop Framework Internal Steps
  6. Java Program to Read File in HDFS
  7. Java Collections Interview Questions
  8. Garbage Collection in Java

Monday, November 6, 2023

Compressing File in bzip2 Format in Hadoop - Java Program

This post shows how to compress an input file in bzip2 format in Hadoop. The Java program will read input file from the local file system and copy it to HDFS in compressed bzip2 format.

Input file is large enough so that it is stored as more than one HDFS block. That way you can also see that the file is splittable or not when used in a MapReduce job. Note here that bzip2 format is splittable compression format in Hadoop.

Java program to compress file in bzip2 format

As explained in the post Data Compression in Hadoop, there are different codec (compressor/decompressor) classes for different compression formats. Codec class for bzip2 compression format is “org.apache.hadoop.io.compress.Bzip2Codec”.

import java.io.BufferedInputStream;
import java.io.FileInputStream;
import java.io.IOException;
import java.io.InputStream;
import java.io.OutputStream;

import org.apache.hadoop.conf.Configuration;
import org.apache.hadoop.fs.FileSystem;
import org.apache.hadoop.fs.Path;
import org.apache.hadoop.io.IOUtils;
import org.apache.hadoop.io.compress.CompressionCodec;
import org.apache.hadoop.io.compress.CompressionCodecFactory;
import org.apache.hadoop.io.compress.CompressionOutputStream;

public class BzipCompress {

 public static void main(String[] args) {
  Configuration conf = new Configuration();
  InputStream in = null;
  OutputStream out = null;
  try {
   FileSystem fs = FileSystem.get(conf);
   // Input file - local file system
   in = new BufferedInputStream(new FileInputStream
           ("netjs/Hadoop/Data/log.txt"));
   // Output file path in HDFS
   Path outFile = new Path("/user/out/test.bz2");
   // Verifying if the output file already exists
   if (fs.exists(outFile)) {
    System.out.println("Output file already exists");
    throw new IOException("Output file already exists");
   }
   
   out = fs.create(outFile);
   
   // bzip2 compression 
   CompressionCodecFactory factory = new CompressionCodecFactory(conf);
   CompressionCodec codec = factory.getCodecByClassName
     ("org.apache.hadoop.io.compress.BZip2Codec");
   CompressionOutputStream compressionOutputStream = codec.createOutputStream(out);
   
   try {
    IOUtils.copyBytes(in, compressionOutputStream, 4096, false);
    compressionOutputStream.finish();
    
   } finally {
    IOUtils.closeStream(in);
    IOUtils.closeStream(compressionOutputStream);
   }  
  } catch (IOException e) {
   e.printStackTrace();
  }
 }
}
    

To run this Java program in Hadoop environment export the class path where your .class file for the Java program resides.

export HADOOP_CLASSPATH=/home/netjs/eclipse-workspace/bin  
Then you can run the Java program using the following command.
$ hadoop org.netjs.BzipCompress
    
18/04/24 10:44:05 INFO bzip2.Bzip2Factory: Successfully
  loaded & initialized native-bzip2 library system-native
18/04/24 10:44:05 INFO compress.CodecPool: Got brand-new compressor [.bz2]
 
Once the program is successfully executed you can check the number of HDFS blocks created by running the hdfs fsck command.
$ hdfs fsck /user/out/test.bz2

.Status: HEALTHY
 Total size: 228651107 B
 Total dirs: 0
 Total files: 1
 Total symlinks:  0
 Total blocks (validated): 2 (avg. block size 114325553 B)
 Minimally replicated blocks: 2 (100.0 %)
 Over-replicated blocks: 0 (0.0 %)
 Under-replicated blocks: 0 (0.0 %)
 Mis-replicated blocks:  0 (0.0 %)
 Default replication factor: 1
 Average block replication: 1.0
 Corrupt blocks:  0
 Missing replicas:  0 (0.0 %)
 Number of data-nodes:  1
 Number of racks:  1
FSCK ended at Tue Apr 24 10:49:55 IST 2018 in 1 milliseconds
 

As you can see there are 2 HDFS blocks.

In order to verify that MapReduce job will create input splits or not giving this compressed file test.bz2 as input to a wordcount MapReduce program. Since the compression format used is bz2, which is a splittable compression format, there should be 2 input splits for the job.

   
hadoop jar /home/netjs/wordcount.jar org.netjs.WordCount /user/out/test.bz2 /user/mapout

    18/04/24 10:57:10 INFO client.RMProxy: Connecting to ResourceManager at /0.0.0.0:8032
    18/04/24 10:57:11 WARN mapreduce.JobResourceUploader: Hadoop command-line
    option parsing not performed. Implement the Tool interface and execute your
    application with ToolRunner to remedy this.
    18/04/24 10:57:11 WARN mapreduce.JobResourceUploader: No job jar file set.
    User classes may not be found. See Job or Job#setJar(String).
    18/04/24 10:57:11 INFO input.FileInputFormat: Total input files to process : 1
    18/04/24 10:57:11 INFO lzo.GPLNativeCodeLoader: Loaded native gpl library from the embedded binaries
    18/04/24 10:57:11 INFO mapreduce.JobSubmitter: number of splits:2
  
You can see from the console message that the two input splits are created.

That's all for this topic Compressing File in bzip2 Format in Hadoop - Java Program. If you have any doubt or any suggestions to make please drop a comment. Thanks!


Related Topics

  1. Compressing File in snappy Format in Hadoop - Java Program
  2. How to Compress MapReduce Job Output in Hadoop
  3. How to Configure And Use LZO Compression in Hadoop
  4. Java Program to Read File in HDFS
  5. Word Count MapReduce Program in Hadoop

You may also like-

  1. Replica Placement Policy in Hadoop Framework
  2. What is SafeMode in Hadoop
  3. YARN in Hadoop
  4. HDFS High Availability
  5. Speculative Execution in Hadoop
  6. MapReduce Flow in YARN
  7. How to Run a Shell Script From Java Program
  8. Compressing And Decompressing File in GZIP Format - Java Program

Sunday, November 5, 2023

Installing Anaconda Distribution On Windows

In this post we'll see how you can install Anaconda distribution on Windows.

Anaconda Distribution is a free, easy-to-install package manager, environment manager, and Python distribution with a collection of 1,500+ open source packages. This gives you an advantage that many different packages like numpy, pandas, scipy come pre-installed. If you need any other package you can easily install it using the Anaconda's package manager Conda.

Jupyter Notebook which is an incredibly powerful tool for interactively developing and presenting data science projects also comes pre-installed with Anaconda distribution.

You also get Spyder IDE pre-installed with Anaconda.

Anaconda is platform-agnostic, so you can use it whether you are on Windows, macOS, or Linux.

URL for downloading Anaconda

You can download Anaconda disribution from this location- https://www.anaconda.com/distribution/

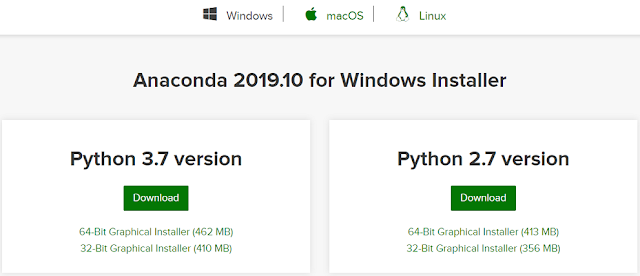
There you will see the option to install for Windows, macOS, Linux. Select the appropriate platform using the tabs. With in the selected platform chose the version of Python you want to install and click on download.

Installing Anaconda Distribution

Installation Process

Once the download is done double click the installer to launch. Click Next.

Read the licensing terms and click “I Agree”.

Select an install for “Just Me” unless you’re installing for all users (which requires Windows Administrator privileges) and click Next.

Select a destination folder to install Anaconda and click the Next button.

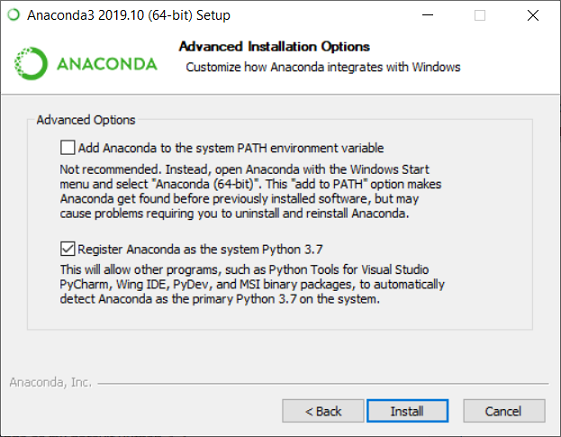
Choose whether to add Anaconda to your PATH environment variable. Anaconda recommends not to add Anaconda to the PATH environment variable, since this can interfere with other software. Instead, use Anaconda software by opening Anaconda Navigator or the Anaconda Prompt from the Start Menu.

Anaconda installation options

Click the Install button. If you want to watch the packages Anaconda is installing, click Show Details. Click the Next button.

Once the installation is complete. Click next.

Click Finish at the end to finish setup.

Verifying your installation

First thing is to check the installed software. In windows click start and look for Anaconda.

Anaconda installation menu options

To confirm that Anaconda is installed properly and working with Anaconda Navigator and conda, follow the given steps.

  1. Anaconda Navigator is a graphical user interface that is automatically installed with Anaconda. Navigator will open if the installation was successful. If Navigator does not open that means there is some problem with the installation.
  2. Conda is a command line interface (CLI), you can use conda to verify the installation using Anaconda Prompt on Windows or terminal on Linux and macOS. To open Anaconda Prompt select Anaconda Prompt from the menu. After the prompt is opened-
    • Enter command conda list. If Anaconda is installed and working, this will display a list of installed packages and their versions.
    • Enter the command python. This command runs the Python shell.

That's all for this topic Installing Anaconda Distribution On Windows. If you have any doubt or any suggestions to make please drop a comment. Thanks!

>>>Return to Python Tutorial Page


Related Topics

  1. Functions in Python
  2. Python count() method - Counting Substrings
  3. Constructor in Python - __init__() function
  4. Multiple Inheritance in Python
  5. Namespace And Variable Scope in Python

You may also like-

  1. Variable Length Arguments (*args), Keyword Varargs (**kwargs) in Python
  2. Bubble Sort Program in Python
  3. Operator Overloading in Python
  4. List in Python With Examples
  5. How to Install Java in Ubuntu
  6. Installing Hadoop on a Single Node Cluster in Pseudo-Distributed Mode
  7. HashSet in Java With Examples
  8. Shallow Copy And Deep Copy in Java Object Cloning

Friday, November 3, 2023

How to Create Ubuntu Bootable USB

In order to install Ubuntu you need a bootable USB/DVD which can be used to install Ubuntu. In this post we’ll see how to create a bootable USB drive that can be used to install Ubuntu on your system.

When do you need bootable USB stick

Apart from fresh installation you can also use a bootable USB drive to-

  1. Install or upgrade Ubuntu.
  2. If you want to work on a system where Ubuntu is not installed. Using bootable USB you can boot into Ubuntu and use it without installing it on the system.
  3. As a troubleshoot to repair a corrupt installation.

What do you need to create a bootable USB

For creating a bootable USB you need-

  1. USB stick of at least 2 GB.
  2. This post shows creation of bootable Ubuntu USB using Windows OS so you should have a system with Windows XP or later version.
  3. Rufus Tool is used here for creating bootable USB drive so you need to download Rufus.
    Location for download- https://rufus.akeo.ie/
  4. You will have to download Ubuntu iso file using which bootable USB will be created.
    You can download it from here- https://www.ubuntu.com/download.
    For this post ubuntu-16.04.3 iso image is used.

How to create bootable Ubuntu USB

Once you have Rufus tool and Ubuntu downloaded you can start the process to create bootable USB.

Launch Rufus tool and plug in the USB. Rufus will identify the plugged USB and update the device dropdown to show it. You can select the correct device manually too.

To be compatible with the current hardware select option “MBR partition scheme for UEFI” in the “partition scheme and target system type” dropdown. If you need it for older hardware you can go with option “MBR partition scheme for BIOS or UEFI”.

To select the downloaded Ubuntu iso file click on the optical device icon which is on the right side of the check box option “create a bootable disk using”. Select the downloaded Ubuntu iso image using the opened file explorer.

Ubuntu bootable USB

Leave all the fields with their default values and click start button. That opens “ISO hybrid image window”. Keep Write in ISO Image mode selected and click on OK to continue.

Ubuntu bootable USB

You will get a warning that all data on the device will be lost. Verify once again that the selected device is correct and click ok.

Process of writing the iso file on the USB will start and progress bar will show the progress. Once the write process is completed you will have a bootable Ubuntu USB.

That's all for this topic How to Create Ubuntu Bootable USB. If you have any doubt or any suggestions to make please drop a comment. Thanks!


Related Topics

  1. Installing Hadoop on a Single Node Cluster in Pseudo-Distributed Mode
  2. What is Big Data

You may also like-

  1. How ArrayList works internally in Java
  2. FlatMap in Java
  3. Serialization Proxy Pattern in Java
  4. Just In Time Compiler (JIT) in Java
  5. Lambda Expressions in Java 8
  6. Insert\Update using NamedParameterJDBCTemplate in Spring framework
  7. Invoking getters and setters using Reflection - Java Program
  8. finalize Method in Java

Tuesday, September 19, 2023

super Keyword in Java With Examples

The super keyword in java is essentially a reference variable that can be used to refer to class' immediate parent class.

Usage of super in Java

super keyword in Java can be used for the following-

  • Invoke the constructor of the super class. See example.
  • Accessing the variables and methods of parent class. See example.

First let's see how code will look like if super() is not used.

Let's say there is a super class Shape with instance variables length and breadth. Another class Cuboids extends it and add another variable height to it. When you are not using super(), constructors of these 2 classes will look like-

public class Shape {
 int length;
 int breadth;
 Shape(){
  
 }
 // Constructor
 Shape(int length, int breadth){
  this.length = length;
  this.breadth = breadth;
 }
}

class Cuboids extends Shape{
 int height;
 //Constructor
 Cuboids(int length, int breadth, int height){
  this.length = length;
  this.breadth = breadth;
  this.height = height;
 }
}

It can be noticed there are 2 problems with this approach-

  • Duplication of code as the same initialization code in the constructor is used twice. Once in Cuboids class and once in Shape class.
  • Second and most important problem is super class instance variables can not be marked as private because they have to be accessed in child class, thus violating the OOP principle of Encapsulation.

So super() comes to the rescue and it can be used by a child class to refer to its immediate super class. Let's see how super keyword can be used in Java.

Using super to invoke the constructor of the super class

If you want to initialize the variables that are residing in the immediate parent class then you can call the constructor of the parent class from the constructor of the subclass using super() in Java.

Note: If you are using super to call the constructor of the parent class then super() should be the first statement inside the subclass' constructor. This ensures that if you call any methods on the parent class in your constructor, the parent class has already been set up correctly.

Java example code using super

public class Shape {
 private int length;
 private int breadth;
 Shape(){
  
 }
 Shape(int length, int breadth){
  this.length = length;
  this.breadth = breadth;
 }
}

class Cuboids extends Shape{
 private int height;
 Cuboids(int length, int breadth, int height){
  // Calling super class constructor
  super(length, breadth);
  this.height = height;
 }
}

Here it can be noticed that the instance variables are private now and super() is used to initialize the variables residing in the super class thus avoiding duplication of code and ensuring proper encapsulation.

Note: If a constructor does not explicitly invoke a superclass constructor, the Java compiler automatically inserts a call to the no-argument constructor of the superclass. If the super class does not have a no-argument constructor, you will get a compile-time error.

That will happen when a constructor is explicitly defined for a class. Then the Java compiler will not insert the default no-argument constructor into the class. You can see it by making a slight change in the above example.

In the above example, if I comment the default constructor and also comment the super statement then the code will look like-

public class Shape {
  private int length;
  private int breadth;
  /*Shape(){
   
  }*/
  Shape(int length, int breadth){
   this.length = length;
   this.breadth = breadth;
  }
}

class Cuboids extends Shape{
  private int height;
  Cuboids(int length, int breadth, int height){
   // Calling super class constructor
   /*super(length, breadth);*/
   this.height = height;
  }
}

This code will give compile-time error. "Implicit super constructor Shape() is undefined".

Using super to access Super class Members

If method in a child class overrides one of its superclass' methods, method of the super class can be invoked through the use of the keyword super. super can also be used to refer to a hidden field, that is if there is a variable of the same name in the super class and the child class then super can be used to refer to the super class variable.

Java example showing use of super to access field

public class Car {
 int speed = 100;
 
}

class FastCar extends Car{
 int speed = 200;
 FastCar(int a , int b){
  super.speed = 100;
  speed = b;
 }
}

Here, in the constructor of the FastCar class super.speed is used to access the instance variable of the same name in the super class.

Example showing use of super to access parent class method

public class Car {
 void displayMsg(){
  System.out.println("In Parent class Car");
 }
}

class FastCar extends Car{
 void displayMsg(){
  System.out.println("In child class FastCar");
  // calling super class method
  super.displayMsg();
 }
 public static void main(String[] args){
  FastCar fc = new FastCar();
  fc.displayMsg();
 }
}
public class Test {

 public static void main(String[] args){
  FastCar fc = new FastCar();
  fc.displayMsg();
 }
}

Output

In child class FastCar
In Parent class Car

Points to note-

  • super keyword in java is a reference variable to refer to class' immediate parent class.
  • super can be used to invoke the constructor of the immediate parent class, that's help in avoiding duplication of code, also helps in preserving the encapsulation.
  • If a constructor does not explicitly invoke a superclass constructor, the Java compiler automatically inserts a call to the no-argument constructor of the superclass.
  • super can also be used to access super class members.
  • If a variable in child class is shadowing a super class variable, super can be used to access super class variable. Same way if a parent class method is overridden by the child class method then the parent class method can be called using super.

That's all for this topic super Keyword in Java With Examples. If you have any doubt or any suggestions to make please drop a comment. Thanks!

>>>Return to Java Basics Tutorial Page


Related Topics

  1. final Keyword in Java With Examples
  2. this Keyword in Java With Examples
  3. static Keyword in Java With Examples
  4. TypeWrapper Classes in Java
  5. Core Java Basics Interview Questions And Answers

You may also like-

  1. Method Overloading in Java
  2. Constructor Chaining in Java
  3. Inheritance in Java
  4. Covariant Return Type in Java
  5. How to Read Input From Console in Java
  6. Difference Between Checked And Unchecked Exceptions in Java
  7. Deadlock in Java Multi-Threading
  8. Java ThreadLocal Class With Examples